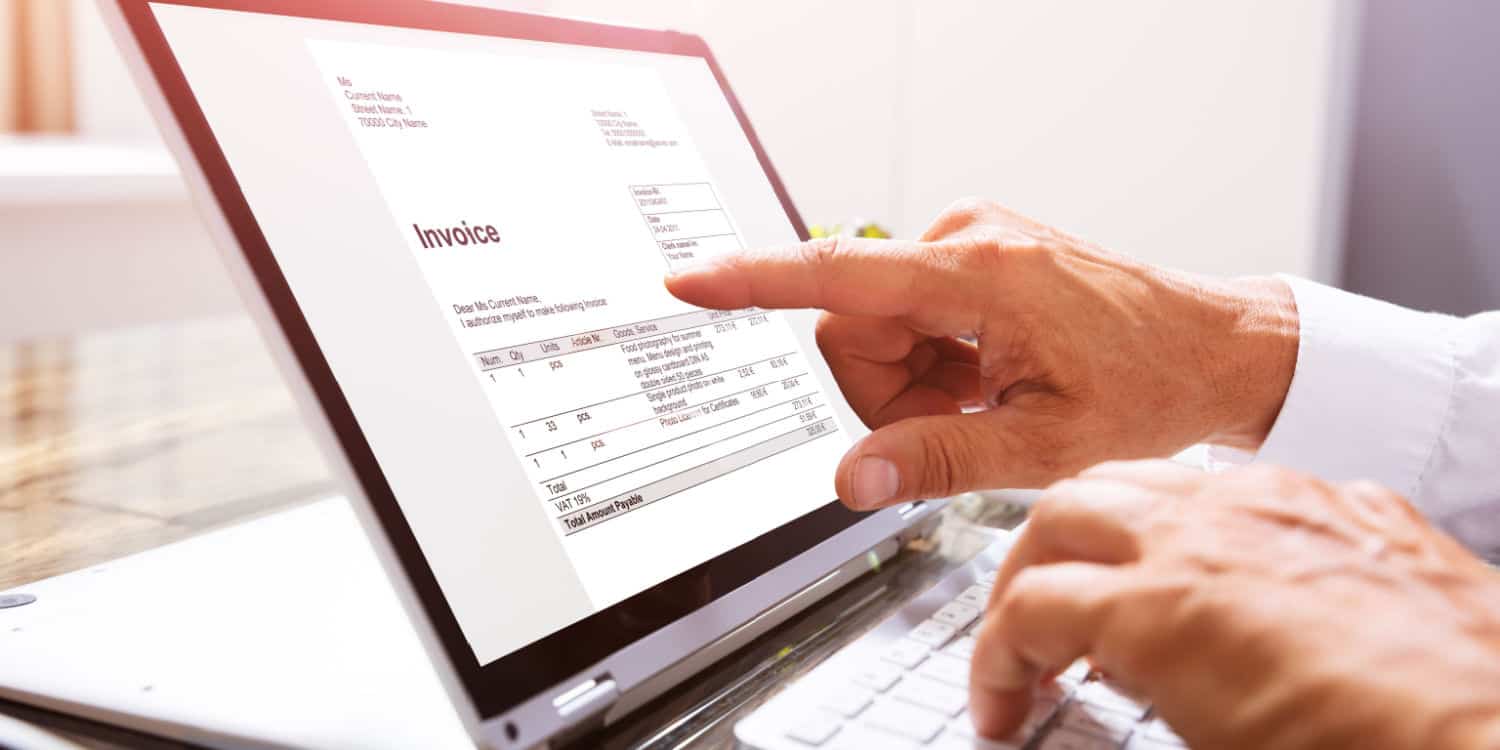

Knowing how to create invoices ensures your business receives payment properly and on time. Late payments are thought to cost small businesses as much as £684 million a year, with most companies receiving payment 5-8 days late on average.
Providing clients with professional and accurate invoices is an effective way to encourage prompt payment for your goods or services.
In this step-by-step guide, we explain how to create standard invoices and VAT invoices, covering everything a limited company needs to include.
Key takeaways
- An invoice is a formal, commercial document that a business sends to a client or customer requesting payment for goods or services it has provided.
- As a limited company, your invoices must include the full company name, registered office address, customer details, and a description of what you’re charging for.
- If your company and your client are both VAT registered, you are legally required to issue VAT invoices per HMRC’s VAT rules.
What is an invoice, and when is it needed?
Before we discuss how to create invoices, let’s start with the basics. An invoice is a formal, commercial document that a business sends to a client or customer to request payment for goods or services it has provided.
An invoice is an integral part of bookkeeping. It records a sale and serves as a payment request, notifying the customer of what was purchased and the payment terms.
- How to improve company cash flow: Our 10 tips
- Pros and cons of voluntary VAT registration
- Can I borrow money from my limited company?
As a limited company, you’re legally required to issue invoices that display your company registration number and registered office address. If you are VAT registered, you must also include your VAT number and ensure compliance with HMRC’s rules on VAT invoices.
Whenever you need to collect payment from a client or customer, you’ll need to issue an invoice.
A step-by-step guide to creating standard invoices
Step 1: Use a professional format
As a legal document, your invoice must look the part. There are several tools you can use to achieve this.
You can format it yourself using an everyday word processor like Microsoft Word or Google Docs, or a spreadsheet like Excel. All of these tend to have a selection of built-in sample invoice templates.
Alternatively, you can source and easily customise an invoice template using bookkeeping software like Sage or FreshBooks or a free design app like Canva.
Whatever tool you use to create your invoices, always ensure you choose a clear font and professional styling that reflects your brand.
You should also include a uniform header featuring your company logo. If possible, incorporate your brand colours to help make your invoice easily recognisable.
To make your invoice stand out even more, consider adding some extra on-brand personal touches. For example, your company tagline or mission statement, and sign off with a thank you message.


Step 2: Input business details
Now that you have your template in place, it’s time to populate it with your key business details.
You’ll need to add information for your company and the individual or business you’re invoicing. This will usually include:
- Your trading name and correspondence address
- Your contact information (such as your telephone number and email address)
- The client’s company name, address, and contact name
- The client’s contact information (such as their telephone number and email address)
- Your full registered company name
- Your registered office address
- Your company registration number
As a limited company, you must legally reference your full registered company name on any invoices you send. If your trading name is something different, you should also include this to help clients recognise you.
The easiest way to do this is to use a phrase like this ‘ABC Technology Services Limited trading as ABC Tech’. This is usually added to the footer of the invoice along with your registered office address, and company registration number.
For limited companies, it’s also important to note that if you decide to add the names of your directors to your invoice, you must include the names of all directors to comply with HMRC rules.
Once inputted, we recommend thoroughly checking over this information before sending it to a customer, to ensure all the details are 100% accurate. This will help minimise any unnecessary delays to your payment.
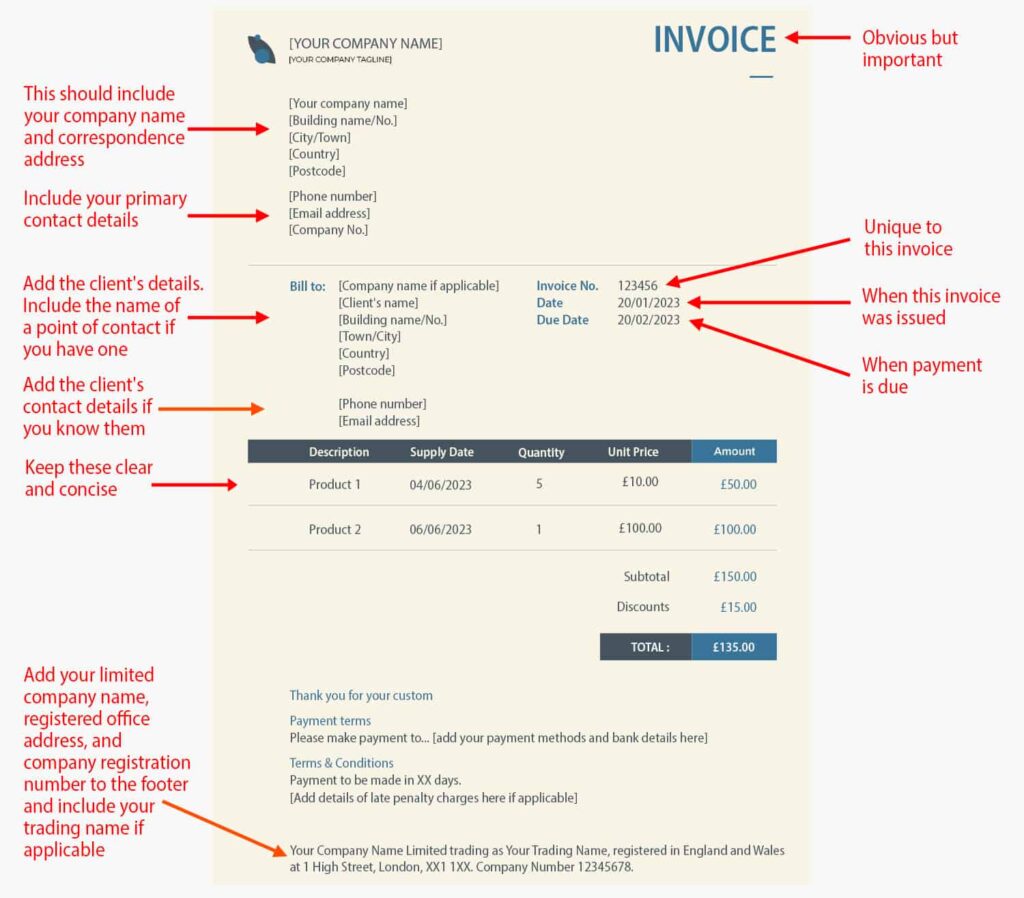
Step 3: Label and identify your invoice
It might sound obvious, but make sure to clearly label your invoice with the word ‘Invoice’ in a prominent position at the top of your document, in a bold or title font. This will ensure that your client knows exactly what they have received. It also helps prevent it from being misplaced or buried amongst other mail.
Government guidelines also require you to include a unique identification number, also known as the invoice number, on every invoice you send. This is a valuable and important feature, as it helps you and your client keep track of invoices at any time – e.g. to chase up late payments or review a past transaction.
How you formulate your unique identification number is entirely up to you. Most companies opt for a sequence of numbers that work in a consecutive pattern, while others combine letters and numbers. Whatever format you choose, keep them consistent and use a pattern that will link to your internal systems to quickly distinguish different invoice types and clients.
Placing the invoice number at the top right or left-hand side of the invoice will help make it easy to spot.
Step 4: Summarise the purchased goods or services
Now that you’ve identified and populated your invoice with your business details, it’s time to itemise the goods or services you’ve provided.
It’s important here to be as concise as possible, whilst including enough description so your client can easily recognise the transaction.
A good way to achieve this is by drawing up a table that lists each item and any related details, such as price and quantity, in an organised fashion, row-by-row.
For example, include columns for the following details:
- The name of the product or service
- A brief description of the product or service (for example, the name of the service might be ‘Social Media Marketing’ and the description might be ‘Facebook Ad Campaign’)
- The quantity provided
- The cost of each individual product or service
Step 5: Break down costs and add a total balance
At the end of the itemised table you’ve created, you’ll want to add up and display the grand total that’s due from your client.
In addition to the products or services you’ve listed, you may also need to charge for extras such as tax and shipping, or apply a discount.
To ensure this information is clear, include a subtotal and add any additional charges or discounts below it before stating your final total. It’s a good idea to bold the Final Total font or enlarge it slightly to make it easy and quick to interpret.
If your business is VAT-registered, you’ll need to issue a VAT invoice, which differs from a standard invoice. We’ll explore this in more detail later on.


Step 6: Include the relevant dates
There are three key dates you should ensure your invoice includes.
Firstly, the invoice’s issue date. This should be located at the top of your invoice so you and your client can instantly determine when the invoice was sent.
Secondly, the supply date. In other words, the date when the goods or services were provided. If you have supplied multiple products or services, the dates may vary. Add a date column to your items table to show the supply date for each product or service delivered.
Finally, the due date. This is the date by which you expect to receive the payment. It is classed as late if a payment does not reach you by this date.
Step 7: List your payment terms
You’ll likely have already agreed on payment terms upfront with your client before issuing their invoice. However, it’s still good practice to note the terms on the invoice itself as a solid reminder.
In addition to the due date, your payment terms should reference how you would like the client to pay and your bank details so that they have all the information to make the payment. It’s a good idea to offer a selection of payment methods for them to choose from to help move the payment process along as swiftly as possible.
Typical payment options may include bank transfer, PayPal, cash, cheque, debit, and credit card.
Offering a direct debit option can be an efficient way to manage regular payments for clients with a repeat purchase history, giving both you and the customer peace of mind. You could include details on setting this up within your payment terms.
This section might also include the currency in which you deal if your company operates across borders.
If you charge late penalty fees, add full details of this to your payment terms.
How to create VAT invoices
If your company is registered for VAT, you are legally required to provide VAT invoices. As we mentioned earlier, these differ from standard invoices.
When creating VAT invoices, you’ll need all the same details as a standard invoice, plus some extra VAT-related information as follows:
- Your VAT registration number
- The unit price for each product or service
- The VAT rate charged
- The total amount, excluding VAT
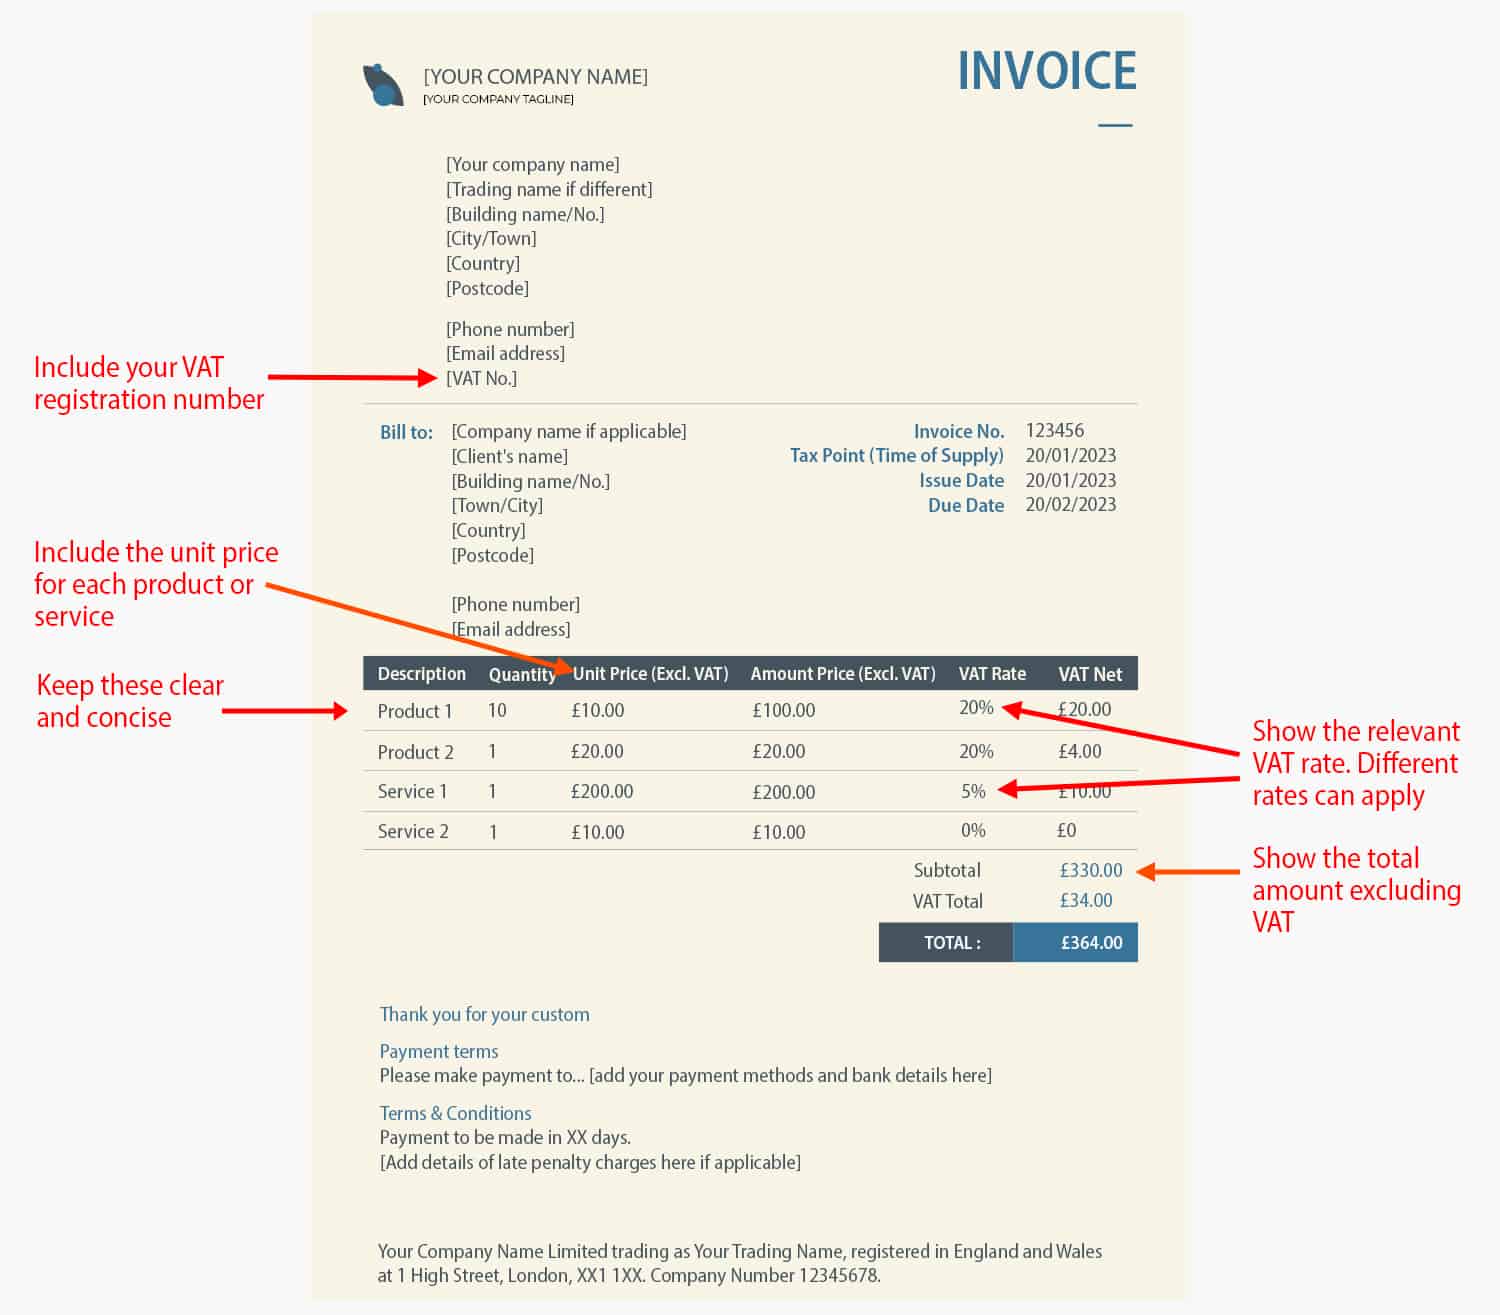
There are three different VAT rates you might charge. These are:
Standard rate
This applies to most products and services unless they fall under a reduced or zero rate. Currently, the standard rate of VAT in the UK is 20%.
Reduced rate
A reduced rate is a lower VAT rate that applies to a selection of specific goods and services and depends on the circumstances of the sale.
Zero rate
Finally, zero rates mean that the goods or services you’ve provided are still VAT-taxable, but the VAT rate you charge is 0%. You must still record zero-rated sales in your VAT accounts and report them on your VAT return.
Visit GOV.UK if you’re unsure about what VAT rate your company should be charging.
You must specify which VAT rate you’ve applied in your invoice.
What other types of invoices are there?
Above, we’ve covered everything you’ll need to include on standard and VAT invoices, which are the most common types of invoices your limited company is likely to use.
However, depending on your industry and the circumstances of the goods or services you provide, you may encounter a range of other invoice types.
Here are some of the main ones to be aware of:
Commercial invoice
Commercial invoices, sometimes referred to as business invoices, are issued when you deliver goods on an international scale.
These invoices form an important part of the documentation needed for foreign trade and contain information essential for the customs authorities.
A commercial invoice should include:
- Both the shipper’s and payee’s details
- The country of origin and the destination
- The shipping date and identification number (sometimes called the air waybill number)
- The shipment quantity
- A description of the goods
- Package format, volume, and weight
- The declared value
- All required signatures
A commercial invoice might also include a declaration confirming the authenticity of the invoice, details of the person who oversees the sale, and any special notes helpful to customs.
Credit invoice
A credit invoice, also called a credit memo, is an amendment to an original invoice. It is issued when a company owes money and needs to change the initial invoice a client received. This could be for several reasons; for instance, if:
- The goods the client received are damaged
- The incorrect items were sent
- The client was overcharged
- The goods sent have been returned
Usually, the credit invoice will display a negative total in a reversal of the original invoice.

Debit invoice
Similar to a credit invoice, a debit invoice, also known as a debit memo, is issued when you want to adjust an original invoice, but this time to increase the total. This may be used when a client has previously been undercharged and extra costs need to be applied.
For example, if a consultant spends more hours on a project than previously agreed upon, or if extra goods are delivered.
Timesheet Invoice
Lastly, a timesheet invoice is used in cases where you want to bill by the hour.
This is a common type of invoice for professionals who offer services in specific industries, such as:
- Lawyers
- Consultants
- Freelancers
- Accountants
- Therapists
The stages of invoicing
When and what type of invoice you send will depend on various factors. For example, the type of goods and services you provide, the timescale at which you provide them, and your company’s and clients’ preferences.
Final invoice
In most cases, you’ll send a final invoice, also known as the standard invoice we’ve detailed in this guide. As its name suggests, the final invoice is typically sent once your service or goods have been provided.
Proforma invoice
Sometimes clients may like to receive a proforma invoice. This gives them an indication of what they can expect from your upcoming goods or services and the estimated cost before they receive them.
This doesn’t act as a demand for payment. However, it allows the client to budget accordingly before your delivery and issuing their final invoice.
Interim invoice
Depending on your industry, goods or services may be part of a large-scale project across a long-term plan. If this is the case, an interim invoice allows you to break down the costs into incremental payments at agreed-upon milestones. This can help make payments more manageable for your client while ensuring regular cash flow for your company.
Past due invoice
Finally, a past-due invoice is issued when a client is late with their payment.
It serves as a reminder of your original invoice, containing all the key information as stated before, along with any subsequent late penalty fees that may be incurred as a result of missing the due date initially specified.
How to send an invoice
Once you have written your invoice, you’ll want to consider how to deliver it to your client. This decision will be straightforward for some companies, but for others, it may require a bit more thought.
How you send your invoices can impact how quickly you receive payment. Some companies use one method for all clients, whereas others may choose a mixture.
Your decision will depend on your company’s preferences and in-house capabilities. However, it’s a good idea to also consider your clients’ preferred communication channels.
Here are the three most popular ways to send an invoice:
By post
Depending on the industry and the customer’s operations, post can still be a preferred method of sending your invoices to clients who perhaps have limited access to emails during the working day, or in cases where emails could be overlooked.
The downside of posting invoices is that it can be a much slower process and less reliable. For example, your invoice could be delayed due to postal strikes, it could take longer to reach the point of contact it’s written to, or your client could change their address. Not only this, but posting comes with a charge.
Via email
Email tends to be the most popular method of sending invoices. It’s arguably the quickest method for both sending and receiving the invoice.
If you choose this option, ensure you have the contact’s up-to-date and accurate email address and attach your invoice as a PDF. You can also password protect it for extra security. You can view Adobe’s simple instructions on how to password-protect a PDF here.
Mention your invoice in the subject line to help make it quick to identify if the client comes back to it at a later date. You should also include a short message in the email itself highlighting any special instructions.
Through invoicing software
Invoicing software such as Sage or PayPal allows you to draft your invoice within a customisable template and schedule and automate invoicing. These features can be ideal when sending out high volumes or requesting regular payments from your clients.
The invoice will arrive with your client as a secure link. This will allow them to make the payment online immediately, ensuring it’s quick and easy for both parties.
Wrapping up
So there you have it – you should now better understand how to create invoices as a limited company.
We hope this guide has provided all the information you need to write invoices and distinguish between the different types and stages of invoicing out there.
Remember, when writing an invoice, especially for the first time, it’s always a good idea to refer to GOV.UK to ensure full compliance with the rules that apply to limited companies.
If you have any questions about this post, comment below and we’ll try our best to help. You can also explore the 1st Formations Blog for more business advice, insights, and limited company guidance.


Join The Discussion
Comments (2)
1st formations- you always provide the most insightful resources. Thanks
We’re glad we continue to be of use to you Claudia.
Kind regards,
The 1st Formations Team